Sunday, August 7, 2016

Working with a Live Edge Slab

Live edge wood slabs are a unique and interesting way to bring wood elements into your home. Reflecting the organic shapes of the trees themselves, live edge slabs pair particularly well with metal components such as welded frames, hairpin legs, or in this case, an antique sewing machine treadle base.

I was excited to find the sewing machine base in a local thrift store.  Even though it was chipped and rusty in some spots, I decided against painting it.  I did polish it with some paste wax and then lightly sprayed it with a clear coat.

The live edge slab was milled locally.  Even though I knew it would be a lot of work to sand it smooth, I definitely underestimated how much work it would take, especially with my little finishing sander.  I really should have invested in a planer or belt sander!  I started with 60 grit and sanded up to 220.  The last pass was with a sanding pad that resembled those green scrubby pads for dishes, but softer.  It was recommended to me by the staff at my local Woodcraft.  I think they are usually used to polish turned wood.

Before sanding the slab, I also filled the cracks and any pits with a 5 minute epoxy mixed with finely ground coffee.  The epoxy-coffee mixture is much darker than the wood, but I thought it would look great with the black base.  Applying it is a bit scary, but it sands down very well.
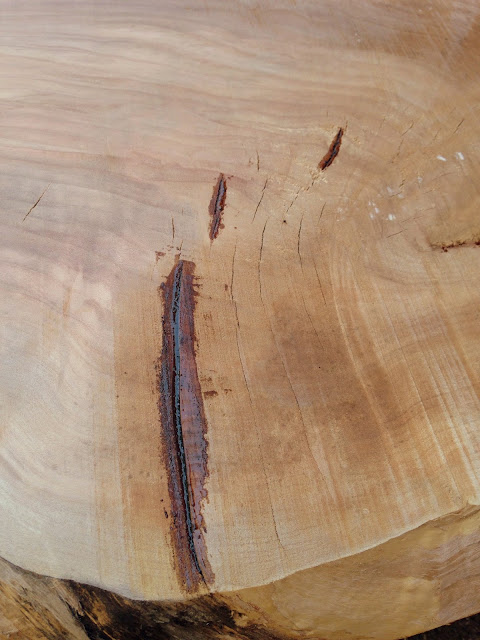
The coffee-epoxy mixture applied to the cracks.
The epoxy filled cracks sanded smooth.

To finish the slab, I applied 2 coats of boiled walnut oil which brought out the grain, followed by a polish with the pad.  I decided I wanted to try using shellac to finish the table.  I hadn't worked with shellac before, and while I liked it, it was definitely challenging to work with.  I made a 1 lb cut and first applied it with a brush.  It came out awful!  The edges of each pass of the brush dried into ripples and looked so silly.  Unlike an oil-based polyurethane that will self level, so brush strokes won't show, shellac is alcohol-based and dries within minutes so technique was really important.  The nice part about shellac, though, is that mistakes can be removed with denatured alcohol, versus polyurethane that usually needs a chemical stripper.

After buffing out the uneven ripples with an alcohol soaked pad, I switched to applying the shellac with a cloth.  It took many more coats than if I'd used a brush to build up that glassy finish, but I'm happier with the results.  After each coat, I polished with the pad.

Even though this table was a lot of work (my shoulders are still sore as I write this!), I love the funkiness of the slab, the asymmetry on the base, and the age of the sewing base.


Monday, July 25, 2016

Ironing Board Beauty

Ahhh, the wooden ironing board.  A staple of rustic decor everywhere.  I was thrilled to find this one in a local thrift store still covered with its fabric padding, and I snatched it up hoping that the padding had protected its wooden top all these years.
Pictured with my other goodies!
After what was practically an excavation of cloth covers and fabric layers, I finally found a pristine wood base!
I count seven layers!
But the fun part of this stripping back was finding the original manufacturer's label! 

This ironing board was manufactured by the J.R. Clark Company in Minneapolis, and dates to the 1930s.  Anyway, back to the redo!

Because the ironing board is in such good condition, with just a few nicks on the legs, I very lightly sanded it with a fine grit sandpaper, and applied danish oil all over.  The most sanding I did was on the top which was pretty smooth but raw wood, and which did not have an aged patina that needed to be saved because it had been covered by the ironing board cover.  The oiled finish gives the wood a hydrated look, silky feel, and a subtle richness.


Tuesday, June 28, 2016

Salvaged Wood Signs

Today I'm sharing the salvaged wood signs I've been working on, now that I've exhausted my stash of materials.  Off to find some more old planks and driftwood!


I feel like I should hum "My Favorite Things" when I work on these pieces!  They really are an expression of my favorite things #simplejoys.


I do have my favorites: the 'Antiques' and 'Ice Cream' ones with the chippy paint, the green 'Farmers Market', and 'Eggs.'  What is your favorite?  These signs will be for sale at The Blend in August.  

The picture taking finally ended with the appearance of this guy!


Thursday, June 9, 2016

Abstract nightstands...and a whole lotta repairs...

I picked up these two nightstands/end tables while I was going through an indiscriminate collection phase.  Indiscriminate because potential pieces at basement prices don't seem to come up too often in my area so I tried to get a hold of anything I could and figure out its potential later.  The seller explained that her mother got them in the 60s second hand even then, so they are old, but I'm not sure how old.  They showed it. In fact, when I finally pulled these out of my stash, I thought that I had bitten off more than I could chew.  I figured that even if I couldn't get these to where I wanted them, it would at least be a good learning experience in repair work, of which I have little.


Detail work was damaged and missing in some sections, the veneer was water damaged and pulling up.  One table had been refinished with a heavy coating of a topcoat (but I'm not sure if it was shellac, lacquer, polyurethane) but the damage to it had not been addressed and so that damage was simply cemented in.  The other one in its original finish had more damage but was easier to repair, although this would come back and bite me later in the process.


Eek, pretty bad, right! So much of the veneer was pulling up on one of the shelves I decided to remove that whole panel of veneer, but it meant that I could patch the veneer elsewhere where entire removal wasn't possible, like on the top.


This may be the most boring progress shot ever, but I had never worked on these types of repairs and I'm really proud of how they turned out!  Using a utility knife I cut around the damaged portions in straight lines, traced the shape onto a piece of paper to make a template, then used that to cut out a matching piece with the salvaged veneer scraps. Wood glue, clamps, wood putty, and lots of sanding make a seamless repair.  

Once all the surfaces were sanded, I painted them in a funky abstract design.  The front of the tables are a pale minty blue which fades to minty green to the back.  And here's where things went off the rails.  I didn't use primer because all my paint has primer built in.  But, the minty two tone idea was a change at the last minute and I'd forgotten that those paints didn't have primer.  The paint still adhered fine, but the original reddish tone showed through.  The original finish table had it the worst because the topcoat on the other that gave me so many problems earlier actually sealed the reddish tone in. Figures!  So, I had the two paint colors matched in a premium paint/primer combo but after repainting the red tone still bled through.  Ugh!!  So, back to the store to pick up a spray shellac which finally solved the problem, but having to do the paint effects three times was a bummer.  However, once completed I am in love with the design.


I decided to use the original knobs.  I like the metallic element they add, and I even daubed gold paint onto the red portion of the design.


The drawer interiors were pretty funky.  Stickers, sticky stuff, damage to the veneer from the sticky stuff...you see where I'm going with this.  But once clean, I covered the drawer bottoms with a fabric from my stash.


It was a marathon project but I'm glad I stuck with it!


Sunday, May 8, 2016

Sweet Child's Chair

I found this sweet little chair at a local thrift store/salvage yard.  It was outside with more weather-proof industrial salvage, so I decided to rescue it from our rainy Pacific Northwest weather and bring it home!

It's a sturdy little chair, but the wood was pretty rough and worn.  Someone had made the webbing seat with care but now the velvet and corduroy fabrics were dirty and faded.


I decided on freshening up this sweet little chair with a coat of white paint and mattress ticking fabric to integrate it into the other items in my stash.  I also added a removable pillow to make a soft backrest for the little backs I hope will soon enjoy it!


After removing the old seat and giving the chair a light sanding and wipe down, I brushed on two light coats of a flat white paint, then sanded the paint down to the raw wood.  It is sealed with polycrylic.  


For the seat, I sewed 2 inch wide strips of cotton mattress ticking and wove them across.  They are simply stapled on the underside of the chair.  The pillow has sweet little trim and ties.


I had so much fun styling this chair with a teddy and boho-inspired bunting.  Its ready for some teddy bear tea parties!


Monday, May 2, 2016

My Nod to Boho Chic

I've always been drawn to the bohemian chic look, both in decor and fashion.  In fact, the wedding dress that I just can't get over is boho chic...but, at the end of the day, it just isn't me (and I do want to resemble myself on our wedding day!) or my design sensibility in general.  Buuuuuut, that doesn't mean that I wouldn't love to have some items of that style in my booth at The Blend.

So you can imagine my excitement when I spotted this vintage rattan peacock chair at a local thrift store - like careening across a four lane road to make the turn kind of excitement #safetyfirst.  The rattan is in great condition.  All this chair needed was a good cleaning and a colorful pillow.

I adore this pillow.  I say again, I ADORE this pillow.  I pieced a striped fabric together to make the square design and used couple different crocheted trims to make the trim and tassels. 


Those little rustic wood boxes will be available in my booth as well.  They a make perfect caddy for crayons or silverware.

Campaign Desk Revived

I call this furniture makeover a revival because this campaign desk went from dark and dingy to bright and lively.  I found this desk by Lane Furniture at our town's annual "world's largest garage sale."  I got it for a steal, especially given how popular campaign furniture is right now, because it weights a ton and the seller didn't want to cart it back home! The seller was a real estate agent and he used it for staging homes.  Over the years the finished got dinged, scratched, and stained from all the moving it in and out of homes, but the hardware and drawers stayed in perfect condition because it didn't receive day to day wear and tear.

The drawer fronts were in great condition, but the veneer on the top was a mess with some gouges in it and the veneer on the desktop and sawhorse legs didn't match.  So, this desk was the perfect candidate for a blended paint and stained wood treatment.

I removed all the hardware and spray painted it a soft brass.  I had hoped to polish the hardware but I realized that wasn't going to resort in the luster I wanted.

The desk body and legs got a rough sanding to prep for paint, and the deepest scratches filled, while the drawer fronts got a careful sanding to remove the current finish.  The top has vertical bands of the same wood veneer on the drawer fronts so I opted to paint around them to add in some contrast on the desktop.  

I primed the desk and legs and painted it in a custom color. Its a slate-y blue with gray undertones.  Its all sealed with polycrylic.  The drawer fronts' original stain color was grayish and drab so I used Minwax Red Oak to give them a warm, honeyish tone.  They are finished with a wipe-on polyurethane.  

I love how the cool blue paint and warm wood tones compliment each other.  I think my favorite feature is how the hardware now pops.

Actually, nope, my favorite feature are the new drawer liners - maps from Hertfordshire, England!

This campaign desk will be one my featured items at The Blend in August.