Sunday, October 19, 2014

Tea Room Table Rescue

This drop-leaf table was my birthday present from my boyfriend.  I guess that should tell you a little something about me!  This table had been in a tea room in our town long ago, and in a private home ever since the tea room closed.  We aren't sure of the age of the table, but guess it is at least 50-60 years old.  And, it is SOLID!  It is all joined, including the top which is constructed so well the seams between planks are barely visible.  The only nails we can find are the square nails holding the table top to the base.

This table was well used and the wear and tear showed.  The top was stained and had burn marks (I like to think from an old kettle); any finish had long since worn away. 

The base received a good scrub with Murphy's oil soap and 0000 steel wool.  Someone had done a horrible stain job on the legs - looked like the stain hadn't been wiped away after being brushed on.  The legs looked like they were coated with old chocolate pudding!  None of the wood grain showed through so I used an environmentally safe stripper and steel wool to remove the gunky stain.  You can see in the before and after below that some of the darker stain still remained in the crevices and dings in the legs, but I loved that rustic effect. After wiping away any residue of the stripper and old stain, the legs got a good cleaning with the oil soap as well.

I lightly sanded the top, which was rough and discolored.  Many of the stains and discoloration remain but that is what gives this table its character, and I didn't want to try to make the table into something it wasn't.  I also chiseled out the white wood filler that was used in the nail holes and sanded the edges.  I sanded with a series of 120, 220, 320, and 400 grit.

The whole table received a treatment of Watco Danish Oil in fruitwood, which has a reddish hue.  The wood was so dry it just soaked it up but now the table has a smooth and silky feel.  

Now, this rustic table has a new lease on life!  We love that we have a small piece of our town's history in our home.


Total time: 5-6 hours over the course of a weekend

Materials:
  • Murphy's Oil Soap
  • 0000 steel wool
  • Environmentally-safe stripper
  • Watco Danish Oil in fruitwood
  • Rubber gloves, foam brushes, sandpaper, tacky cloth, drop cloth

Sunday, April 20, 2014

Figgy Goaty Flatbread

Doesn't that title just say yum!!

I make this up for parties a lot because it is so easy and fast, and you can substitute different sweet ingredients depending on the time of year.


Figgy Goaty Flatbread

  • 1 pizza dough (I use Trader Joe's)
  • fig butter (also Trader Joe's).  When figs are in season, used sliced fresh figs, or sliced red grapes are a good option.
  • 1/2 medium red onion
  • goat cheese
  • white wine (optional)
  • thyme, dried or fresh
  • olive oil
  • balsamic vinegar, high quality that is thick, already reduced, or balsamic glaze
  • fresh parsley
  • cornmeal
  • optional: procuitto

1. Preheat the oven to 500-520 degrees F.  If you have a pizza stone, put it in the oven to heat as well.

2. Slice the red onion and saute over low heat in olive oil.  Don't let it brown.  Season with a pinch of thyme and salt.  Splash in a little white wine (oh and also put some on the onions) and continue to cook over low heat for a few minutes until the wine has evaporated.  The onions shouldn't be totally soft as they will continue to cook in the oven.

3. Roll out the pizza dough to desired thickness on a floured board.  Place the red onion slices over the dough.  Spoon 1 tsp sized dollops of the fig jam over the dough (or the sliced figs or grapes).  Scatter chunks of the goat cheese around as well.  (Add the prosciutto if using).

 
4. When the oven is up to temperature, take out the hot pizza stone, careful not to melt your mascara! Sprinkle a dusting of cornmeal on the stone and slide the topped dough from your floured board onto the pizza stone.  If you used enough flour, and jiggle it carefully, the dough should slide right over.  You could also put the rolled out dough on the stone and top it then, if you work fast so the stone doesn't cool too much.

5. Drizzle olive oil over the top and bake in the over for 10-15 min.  Cooking times will vary depending on the size of your oven and rack position.  A rack in the highest position will make this cook faster so just keep an eye on it.  The crust should be puffed on the edges and lightly browned.

6.  Remove from oven and let cool for 5 minutes.  Drizzle a bit more olive oil and the balsamic glaze.  Sprinkle with chopped parsley.  Enjoy!


I made this for our Easter picnic on the beach, but after getting a flat tire and needing to be towed back home, I don't have any pretty figgy-goaty-flatbread-on-the-beach shots.  Just this gem of David in the tow truck.


Friday, April 4, 2014

The Double Dipped Bentwood Beauty

This little number needed some major TLC after being abandoned to our concrete jungle!  The caning was shredded and it looked like it had been living outside for a while.  But, with the classic bentwood lines, this Thonet style chair was a perfect candidate for a makeover!


After cutting away the ruined caning, I lightly sanded the entire chair with 320 grit sandpaper.  There wasn't any original finish left and it just needed to be smoothed out.

I painted the legs in aqua blue for the dip effect.  Once it was dry, I taped off a narrow band above the blue and painted it gray - the double dip!

The chair is finished with Watco Danish Oil in Fruitwood, which gives the wood a silky feel and warmed up the wood tone.  

The seat is upholstered in a cute gray tiger stripe fabric and high density foam.  The fabric is pleated around the base of the cushion.

Wrap the foam with a layer of batting. Staple the batting to the sides of the wood base to reduce bulk under the fabric.

Position the seat on the fabric, centering the design.

Pleating the fabric helps it lay flat.
Now, this bentwood beauty is a perfect blend of classic lines and modern style.

Love it?  Check out the ad listing here.


Friday, March 28, 2014

Bachelor Pad Woes Go to Wows!

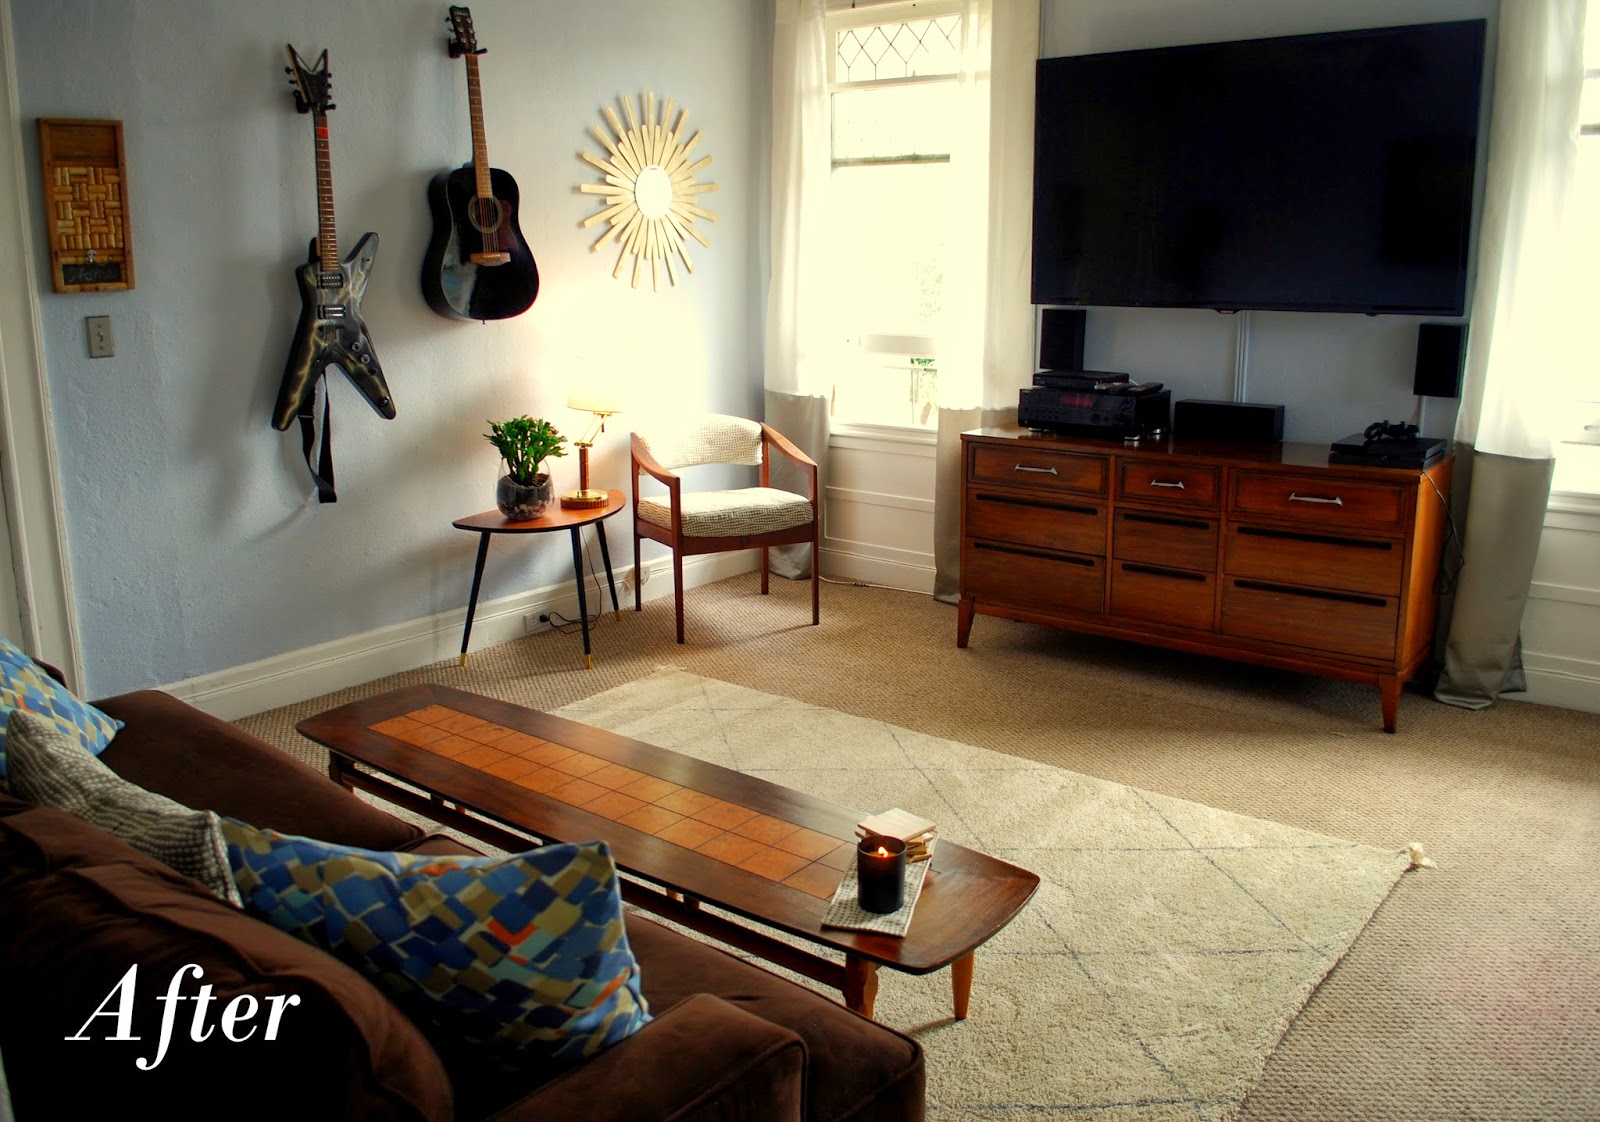
Ugh - that was a lame post title. Anyway, my friend Jason was in desperate need of a living room makeover. His living room poses some challenges. An almost perfectly square room, it has doors on three walls and two large windows on the fourth. It is also pretty small (he has an apartment in an older house) and we needed to accommodate an insanely large TV that was already mounted and couldn't be moved. Not to mention the industrial renter's standard blah carpet.

I really love this makeover as it was a blend of DIY projects, Ikea hacks, and making over things he already owned. It was a true make it work project!   Luckily, he already had a couch, an MCM dresser for storage, and an MCM chair so we were able to complete the rest on only $550.

In an effort to make the space more homey, Jason experimented with a deep brick red. In that small a room it just didn't work so he repainted it a light gray blue instead.  


I wanted to aim for MCM lite that is clean and sleek but comfortable and didn't look like the set of a TV show! The plan for the space used a blend of patterned and textured fabrics, wood tones, and metallic sheen.

The MCM dresser and chair were lucky finds a couple years ago. The dresser was bought for a steal at a thrift store and refinished. The chair was found discarded on the side of the road and refreshed with new upholstery and oil. It really floors me sometimes what some people discard.

I pulled off the brown pillow covers that matched the couch - it was just too much brown! I sewed new pillow covers in patterned fabric to lighted up the space. The gauzy Ikea curtains were dressed up with gray shantung silk panels sewed to the bottom of the curtains. I used the Ikea rug to mimic a Beni Ourain rug, by drawing the diamond pattern with a Sharpie.  See the full how-to here.  The corner tassels are made of yarn in the same shade as the rug. We really lucked out with the coffee table that was unused in a relative's storage shed. The large wall also allowed us to display Jason's guitars. He is an outstanding musician and now his guitars are in early reach.


The starburst mirror is one of my favorite DIYs. Made out of wooden paint stirrers from the hardware store and painted gold, it adds some much needed shine and shape for about $10. The side table is Ikea and the lamp is a consignment store find that was neglected at the back of a display shelf. A good cleaning and new shade and it is back in business!


I installed the shelves low on the wall, and hung a large painting above. The painting is inspired by a wall paper I caught a glimpse of in a decor mag in the grocery store aisle and could never find again. The little beaten copper cup was a thrift store find.

I love that we were able to get more of Jason's artwork and treasures into the space but it still feels light, bright, and clean. And most importantly, Jason loves it!

Rescued, Restored, and Revived MCM Nightstand

I found this sweet little MCM nightstand in a local thrift store and, boy, was she in need of some TLC!  After some much needed reconstruction with glue and wood putty, she was revived with a coat of Benjamin Moore's Tropicana Cabana and gold paint on her dainty tapered legs.  


Doesn't she just remind you of the aqua blue waters and golden sand of a Caribbean island? 


The cavity and the drawer are lined with a black and white chevron to make it pop.   The nightstand is finished with Minwax satin polycrylic finish.

Love it? See the sale ad posting here.